A cat wall climber turns blank wall space into a feline adventure zone your cat will actually use. Building your own saves money, lets you match your home's style, and gives you full control over safety and sizing. These DIY cat wall climber ideas will help you plan, build, and customize the perfect setup for your cat.
- Key Takeaway 1: Wall-mounted cat climbers use vertical space efficiently, keeping floors clear and cats entertained.
- Key Takeaway 2: Solid wall anchoring into studs is the single most important safety step you can take.
- Key Takeaway 3: You can build a complete cat wall system for under $100 using basic hardware store supplies.
- Key Takeaway 4: Carpet, sisal, and cork all work as surface materials — each offers different grip and durability.
- Key Takeaway 5: Planning your cat's path before you drill saves time and prevents costly repositioning later.
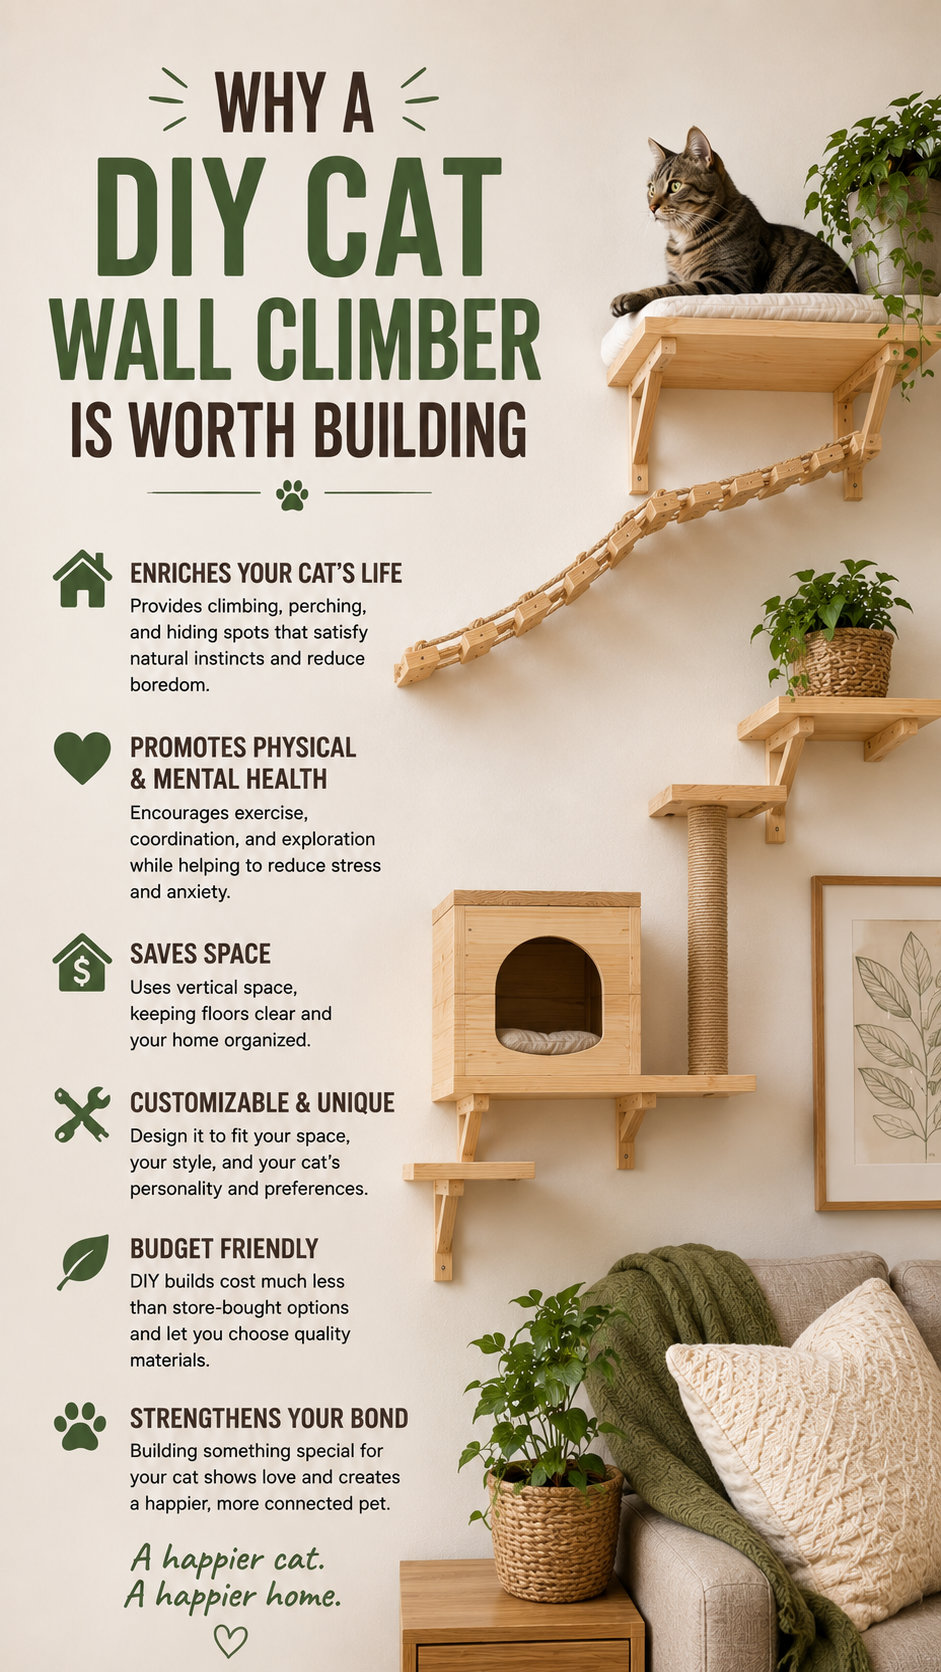
Why a DIY Cat Wall Climber Is Worth Building

The Benefits for Your Cat's Health
Cats are natural climbers. Getting up high reduces stress, satisfies hunting instincts, and gives shy cats a safe retreat away from dogs or children.
Regular climbing also builds muscle tone and burns calories. This matters especially for indoor cats who lack outdoor exercise opportunities.
If your cat is showing signs of boredom — destructive scratching, overeating, or restlessness — a wall climber can make a real difference. It gives them a purpose-built outlet for natural behaviors.
Why DIY Beats Store-Bought
Commercial cat wall systems often cost $200 to $600 or more. A DIY version using wooden shelves and brackets can cost a fraction of that.
You also get complete control over layout, height, spacing, and materials. Store-bought kits are designed for average cats in average spaces — your home is neither of those things.
DIY means you can match your wall color, choose cat-safe finishes, and expand the system whenever you want. It's a living project that grows with your cat's needs.
Is It Difficult to Build?
If you can hang a picture frame, you can build a basic cat wall climber. Most beginner builds take a single afternoon with simple tools.
More complex systems with ramps, tunnels, and multiple levels take a weekend. Even those don't require advanced woodworking skills.
Planning Your Cat Wall Climber Layout
Map Out the Space First
Before you buy anything, stand in the room and think about where your cat already hangs out. Cats are creatures of habit — placing the climber near their favorite nap spot encourages faster adoption.
Use painter's tape on the wall to mark potential shelf positions. This lets you visualize the path without committing to any holes.
Think about the entry and exit points. Your cat needs a way to get onto the lowest shelf and a way to get down safely — especially important for older or heavier cats.
Finding Wall Studs
Anchoring into studs is non-negotiable. A 12-pound cat launching itself onto a poorly anchored shelf can pull it straight off drywall.
Use a reliable stud finder and mark every stud in your planned build area. Standard stud spacing is 16 inches, so once you find one, the rest are predictable.
If studs don't line up with your ideal shelf positions, use a solid mounting board — a horizontal piece of wood screwed into two studs — and then attach shelves to that board.
Spacing and Step Height
Leave 12 to 18 inches of vertical space between each shelf level. This gives your cat room to jump comfortably without feeling cramped.
Horizontal spacing between adjacent shelves should be no more than 24 inches — less if you have a smaller or older cat. You want confident, comfortable jumps, not athletic leaps that risk a fall.
A staggered zigzag pattern works better than a straight vertical stack because it encourages movement and exploration.
Materials and Tools You'll Need

The Best Wood Choices
Pine boards are the go-to choice for DIY cat shelves. They're cheap, easy to cut, and widely available at any hardware store.
A standard 1×8 or 1×10 pine board gives cats enough room to sit and turn around comfortably. For larger cats, go wider.
Plywood is another solid option if you're building larger platforms or ramps. Use at least ¾-inch thickness so shelves don't flex under weight.
Surface Materials for Grip and Comfort
Raw wood can be slippery, especially for older cats with weaker joints. Covering shelves with carpet remnants, sisal rope, or cork adds traction and texture.
Carpet remnants are cheap and easy to staple-gun into place. Sisal adds a scratching surface right on the shelf, which most cats love.
Avoid anything with loose pile or long fibers that could catch claws. Short-loop carpet or tightly wound sisal is safest.
Hardware and Mounting Options
Heavy-duty L-brackets are the simplest mounting solution. Choose brackets rated for at least twice your cat's weight per shelf.
Floating shelf brackets give a cleaner, more modern look. Make sure they're rated for dynamic loads — cats don't land gently.
You'll also need wood screws, a drill, a level, and sandpaper to smooth any rough edges before your cat uses the shelves. Check out
Recommended Products
for recommended mounting hardware, carpet tape, and sisal materials that work well for cat wall builds.
DIY Cat Wall Climber Ideas by Style
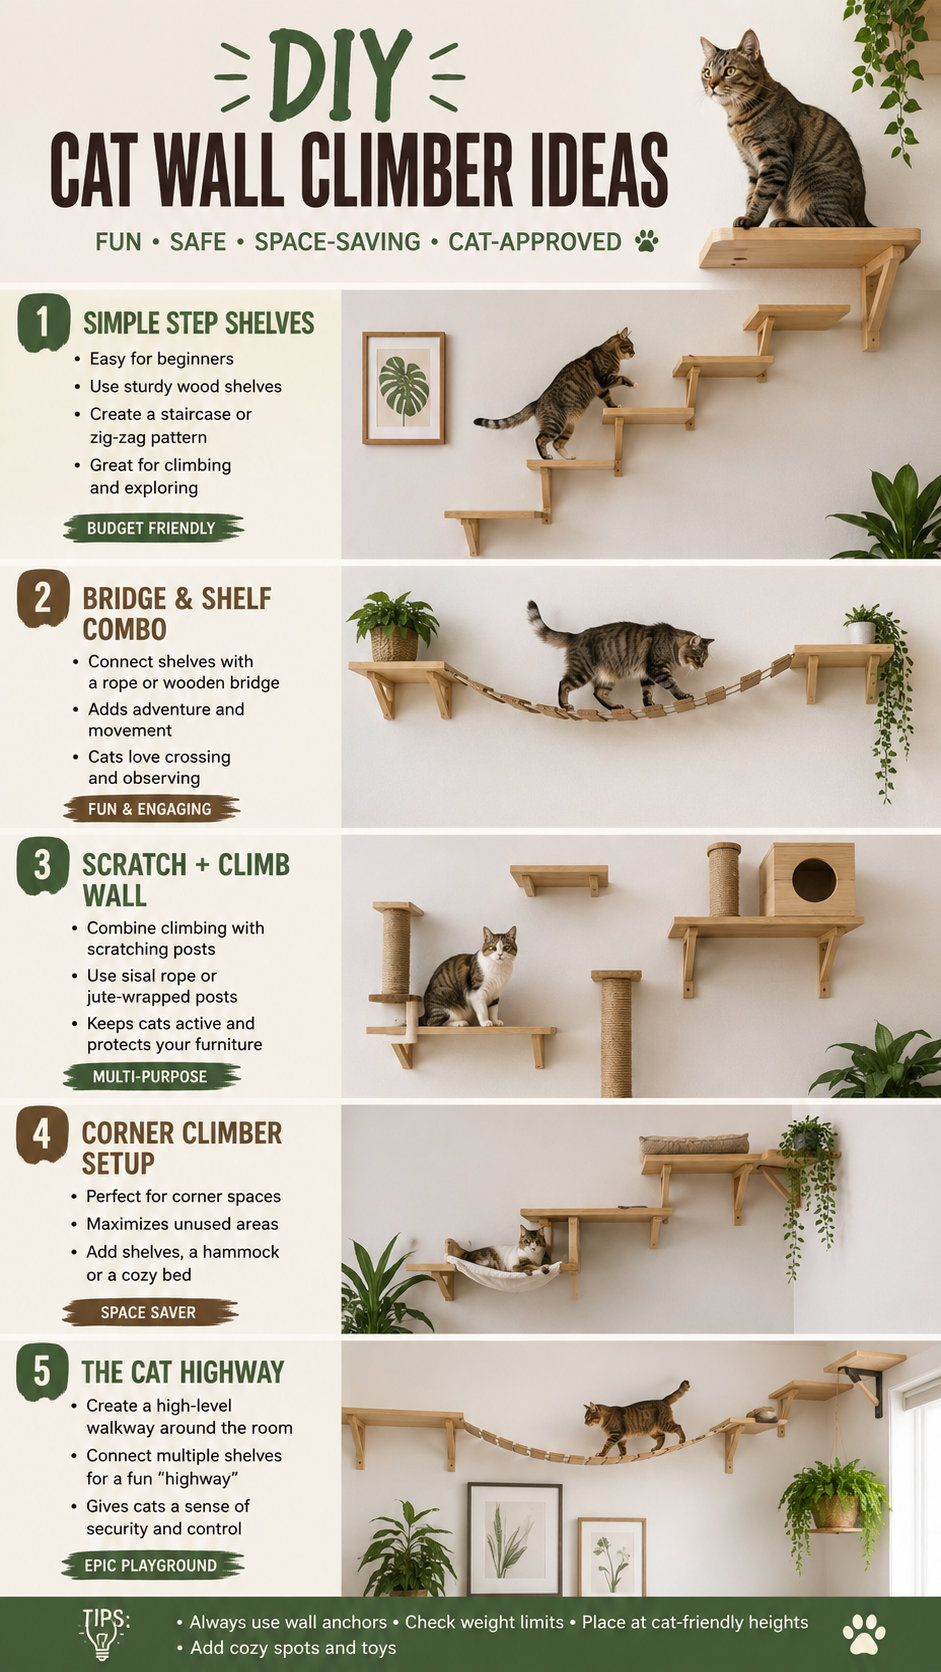
The Simple Zigzag Shelf Path
This is the most beginner-friendly design. You mount five to eight small shelves in a staggered pattern from floor height to near the ceiling.
Each shelf is roughly 12 to 16 inches long and 8 to 10 inches deep. The cat hops from one to the next in a rising zigzag path.
This works in almost any room and takes about four hours to complete. It's also the easiest design to expand later by adding more shelves.
The Cat Highway with Tunnel and Perch
A cat highway runs shelves at a consistent height around the perimeter of the room. Cats can travel the full circuit without touching the floor.
Add a sisal-wrapped tunnel between two sections and a large corner perch at the highest point. This turns a basic shelf run into a full enrichment environment.
This style takes more planning and a full weekend to build, but it's one of the most enriching setups you can give an indoor cat.
The Industrial Pipe and Wood System
Black iron pipe brackets paired with stained wood planks create a bold, modern look that fits industrial or minimalist decor.
The pipe acts as both the shelf support and a narrow balance beam cats can walk along. Add wooden platforms at intervals for resting spots.
This style is slightly more expensive but looks intentional and stylish rather than like a cat accessory bolted to the wall. Many cat owners display this design in living rooms without it looking out of place.
The Corner Climbing Tower
Corners offer two walls for anchoring, which makes them structurally ideal for taller builds. A corner tower can reach ceiling height safely.
Mount shelves on alternating walls as you go up, so the cat spirals upward toward the top perch. This creates a lot of climbing distance in a small footprint.
At the top, install a large corner shelf or hammock as the reward spot. Most cats will claim this as their favorite high-up napping location within days.
Keeping Your Cat Wall Climber Safe

Weight Testing Before Use
Before your cat uses any shelf, test it yourself. Push down hard on each shelf with your hand and apply lateral pressure.
If anything shifts, wobbles, or feels soft, reinforce it before your cat gets on. Better to catch a weak bracket now than after your cat has a fall.
Each individual shelf should hold at least 50 pounds comfortably — that's many times your cat's weight, accounting for the impact of jumping.
Sanding and Finishing for Safety
Sand all edges and corners with 120-grit sandpaper before mounting. Rough edges can catch fur or scratch delicate paw pads.
If you paint or stain the wood, use pet-safe, water-based products and let them cure fully before installing. Most paints need 72 hours of ventilation time to off-gas completely.
Check all surfaces for splinters every few months. Wood can crack over time, especially in areas with humidity changes.
Regular Maintenance Checks
Inspect every bracket and screw at least once a month. Cats put repeated dynamic load on wall mounts, and screws can loosen over time.
Replace carpet or sisal surfaces when they show heavy wear. Worn, frayed surfaces lose grip and can become a claw hazard.
Check the wall around each mount for any cracking or movement — this signals the mount may be pulling out and needs immediate reinforcement. You can read How to Build a Minecraft Cat Tree: Step-by-Step Guide for All Versions for a full guide on cat-proofing your home safely.
Getting Your Cat to Use the Wall Climber

Introduction Tips
Don't place your cat on the shelves — let them explore on their own terms. Forced introductions create negative associations.
Rub a cloth on your cat's cheeks and wipe it on each shelf. This deposits familiar scent and signals to your cat that the space is safe.
Place treats on the lower shelves first. Once your cat confidently visits those, move treats higher up the system over several days.
Using Toys and Catnip
Hang a dangling toy from a higher shelf to encourage your cat to look up and investigate. Curiosity is a powerful motivator for most cats.
A pinch of dried catnip rubbed onto the surface of shelves works especially well in the first week. It triggers investigative and playful behavior that gets cats comfortable with the new structure.
Once your cat uses the climber regularly on their own, you can remove the extra incentives. The high perch becomes its own reward.
Patience With Hesitant Cats
Some cats — especially seniors or very cautious personalities — take two to four weeks before fully adopting a wall climber. Don't rush it.
Make sure the lowest shelf is easy to reach from the floor. A step up that's too high can deter a nervous cat from ever trying.
If your cat still ignores the climber after a month, consider repositioning the entry point or reducing the first jump height. Small adjustments often make a big difference.
Frequently Asked Questions
How much weight can DIY cat wall shelves hold?
With proper stud anchoring and heavy-duty brackets, DIY cat shelves easily hold 50 to 100 pounds. Even large Maine Coons or Ragdolls weigh under 25 pounds, so a well-built shelf has enormous safety margin.
What is the best material to cover cat wall shelves?
Short-loop carpet and sisal are both excellent choices. Carpet is softer and warmer; sisal doubles as a scratch surface. Avoid shag or long-pile carpet, which can catch claws and cause injuries.
How high should cat wall shelves be?
The bottom shelf should sit 18 to 24 inches off the floor so your cat can jump up easily. The highest shelf can go as close to the ceiling as you like — most cats are thrilled by maximum elevation and will use a perch right below ceiling height.
Can I build a cat wall climber without drilling into studs?
It's not recommended for anything a cat will actually climb on. Drywall anchors alone are not reliable under dynamic loads. If you genuinely cannot find studs, mount a horizontal backing board into two studs and attach all shelves to that board instead.
How long does it take to build a basic cat wall climber?
A simple zigzag shelf system with five to six shelves takes most people three to five hours including measuring, cutting, covering with carpet, and mounting. More complex systems with ramps and tunnels take a full weekend.
Building your own DIY cat wall climber is one of the highest-impact projects you can do for an indoor cat's quality of life. With basic tools, a clear plan, and solid anchoring, you can create a safe and stylish climbing environment that keeps your cat active, mentally stimulated, and happily off your furniture. Start simple, build safely, and expand the system as your cat's confidence grows.
This website contains affiliate links. As an Amazon Associate and an affiliate for other programs, I earn from qualifying purchases. Clicking on an affiliate link may result in a commission being paid to me at no additional cost to you.





Leave a Reply