Cats have a strong affection for climbing and finding the perfect spot for their snoozes; figuring out an ideal place for them may seem like a riddle. I faced this exact situation until I discovered the wonders of do-it-yourself cat wall hammocks.
Imagine, cats sleep for as long as 16 hours a day – they really need this relaxation.
So, I immersed myself in the task of working out how to craft a comfortable hammock my cat wouldn't snub. This guide assists you in creating one using just some canvas or denim and basic tools like scissors or a sewing machine.
You'll understand how to fix it tightly on the wall with a drill bit and shelf methods – zero need for sophisticated devices.
Let's begin and create something wonderful together!
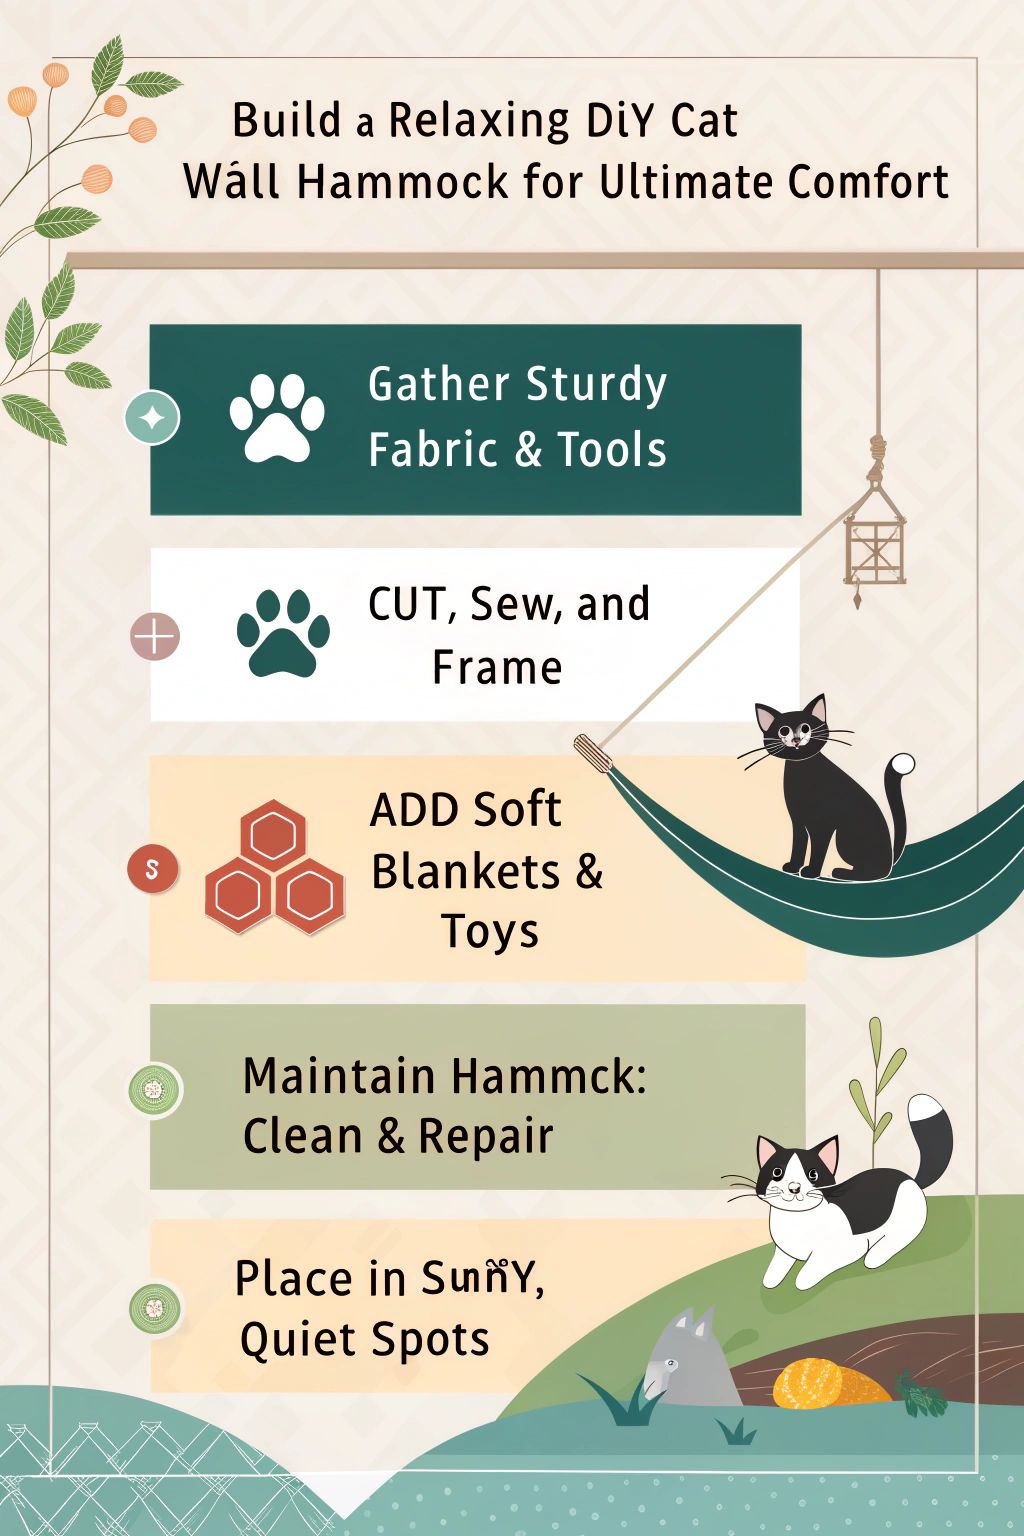
Key Takeaways
- You need sturdy fabric like canvas or denim, scissors, sewing kits, or staple guns to make a cat wall hammock.
- Cut fabric and webbing ribbon to size, then sew or staple it onto a wooden frame. Secure the frame well to the wall.
- Add soft blankets for comfort and toys for fun.
- Keep the hammock clean with mild soap and water. Check regularly for any loose threads or damage.
- Place the hammock in sunny spots or quiet corners where your cat feels safe.
Materials Needed for a Cat Wall Hammock

For your cat wall hammock, you'll need sturdy cloths like canvas or denim. Get ready with tools–scissors, needle and thread sets, or staple removers too.
Durable fabrics like canvas or denim

Selecting the appropriate fabric for a do-it-yourself cat hammock is imperative. Both canvas and denim excel due to their strength. Based on my observation, it's apparent that 1 yard of either fabric suffices, ideally in dimensions of 27″ x 17 1/2″ for larger cats or 22″ x 13 1/2″ for the smaller ones.
Such materials can resist sharp claws and lots of jumping.
A reliable fabric is akin to a trustworthy friend: sturdy and dependable.
For recycling enthusiasts, transforming an old pair of denim pants into a hammock brings out your creativity and helps the environment. Just by stitching the pant legs together, a resilient piece ready for use is realized.
Both canvas and denim share a simplicity in cleaning, which simplifies things.
We should discuss the necessary tools up next…
Tools like scissors, sewing kits, or staple guns

I need some basic tools to make a DIY cat hammock. Scissors are a must for cutting fabric. I also grab a sewing kit, which includes needles and thread. This helps me sew the seams strong enough to hold my cat.
A staple gun is handy too. It quickly attaches the fabric to the wooden frame or wall. Using these tools makes building easy and fun. Having everything ready keeps things moving smoothly, giving my feline friend their perfect spot to relax!
Step-by-Step Guide to Building a Cat Wall Hammock

Building a cat wall hammock is fun and easy. Start by cutting your strong fabric into the right size, then use tools like a box cutter or scissors to get it just right. Next, put together the frame using webbing ribbon.
Finally, attach it securely to the wall with a staple gun or sewing kit. Your cat will love their new cozy spot!
Cutting and preparing the fabric

Cutting and preparing the fabric is an important step for the cat hammock. This ensures it will be strong and comfy.
- First, I cut two squares that are 18×18 inches (45 x 45 cm). These will be the base of the hammock.
- Next, I measure and cut two strips that are 40 inches by 3 inches (100 x 7.5 cm). These strips will form the arms of the hammock.
- To prevent fraying, I singe the ends of webbing ribbon using a lighter or candle flame.
- Then, I take a piece of polypro webbing, which is 60 inches long. I cut this into four sections that are each 15 inches long. These will become corner straps for extra support.
- If needed, I use a ruler to make sure my cuts are straight before cutting.
This careful preparation helps create a sturdy structure for my cat’s new comfy spot!
Assembling the hammock structure
After cutting and preparing the fabric, I moved on to assemble the hammock structure. This part is crucial for making sure the hammock is strong and safe.
- Gather your materials. You'll need 2×4 lumber, carriage bolts, washers, and nuts. Make sure these parts are ready.
- Align the base pieces. Cut four 21-inch pieces of lumber with mitered ends. Lay them out in a rectangle for the frame.
- Drill holes for bolts. Use a drill to make holes in each corner of the wooden frame. These will hold everything together.
- Insert carriage bolts. Place a bolt through each hole from the outside of the frame toward the center.
- Add washers and nuts. Slide a washer on each bolt after it comes through the wood, then screw on a nut tightly to secure it.
- Tighten everything up. Use a wrench to tighten all of the nuts snugly against the wood. This keeps your structure sturdy.
- Attach dowel rod supports. Cut two dowel rods to fit inside your frame for extra strength while your cat relaxes.
- Place additional hardware as needed—if you want more support, add extra bolts or screws where needed.
Every step matters here… Make sure it's all snug! Your cat will love this cozy spot once it's finished!
Attaching the hammock to the wall
Attaching the hammock to the wall is key for your cat’s safety and comfort. I want to make sure it’s secure.
- Find the Studs: Use a stud finder. Locate the stud near the edge of your doorway. This gives a strong hold for your hammock.
- Mark Your Spots: Once you find the studs, mark where you'll attach the caps. Ensure they are evenly spaced for balance.
- Prepare the Caps: Get your lag screws ready. These will help keep everything in place.
- Drill Holes: Carefully drill holes in marked spots on the wall. Be gentle to avoid splitting the wood.
- Attach Caps with Screws: Using a drill or screwdriver, attach each cap securely with lag screws. Make sure they are tight—this keeps your cat safe from accidents.
- Hang Your Hammock: Now, take your fabric hammock and attach it to the caps you just installed. Make sure it's level before letting your cat jump in.
- Check Stability: After hanging, give it a gentle tug to ensure it's secure. Your cat will want a stable place to relax.
- Regular Inspections: Check the hammock often for any looseness or wear over time, and tighten as needed.
This simple process can provide a cozy retreat for your furry friend!
Customization Ideas for Your Cat Wall Hammock

You can make your cat wall hammock extra special. Add fabric that matches your home, or choose a soft fleece blanket for comfort… Your feline friend will love some fun toys, too!
Incorporating design elements that match home decor
I want my cat wall hammock to look nice in my home. Using durable fabric, like canvas or denim, can help with this. I can choose colors and patterns that match my room's style.
Adding small design elements makes the hammock even better. I might use a fleece blanket to add softness and comfort. This creates a cozy spot for my cat while keeping my decor in mind.
Matching these design options helps the hammock fit right into my space…making it both fun and stylish!
Adding toys or accessories for additional fun
To make a cat wall hammock more fun, I like to add toys. Hanging colorful ribbons or ropes can catch my cat's attention. These little touches invite them to play and explore their space.
I also use grommets to secure these toys. This keeps them safe as my cat jumps around.
Interactive elements are great too! Dangling toys can swing with movement, attracting curious paws. My cats love reaching for them while lounging in their new hammock. Positioning these accessories where they can easily grab makes playtime even better.
It’s simple, yet it brings joy and keeps my cats engaged!
Placement Tips for Maximum Comfort and Use

Cats love cozy spots. Place the hammock near windows for sunny naps. A quiet corner adds safety too… They'll feel more secure there.
Ideal locations for cat hammocks in your home
I find that elevated spots are perfect for cat hammocks. Cats love to be up high. A sunny window is a great choice too. The warmth and light attract them.
Quiet corners in living rooms or bedrooms work well for resting. Cats feel safe there, away from noise and activity. If you have an outdoor space, place the hammock on a secure balcony or screened porch.
This keeps your cat safe while they enjoy fresh air….
Next, let’s look at how to keep these hammocks clean and maintained!
Considerations for safety and accessibility
Safety is key when I build a cat wall hammock. I make sure to install it into wall studs or solid anchors. This keeps the hammock safe and strong for my cats. Platforms should be about 14 inches off the ground.
Steps need to be spaced 12-18 inches apart so my cats can jump easily.
Accessibility matters too. I place hammocks near areas where my cats eat or lounge. This way, they explore and enjoy their new space more often. Keeping pathways clear allows them to move freely without getting stuck.
These simple steps help ensure that my furry friends stay safe while having fun!
Maintenance and Care of Cat Hammocks

Cleaning your cat hammock is simple. Use mild soap and water to wipe it down, or toss it in the wash if it's washable. Regularly check for loose threads, too. This keeps the hammock safe and comfy for your furry friend….
Cleaning tips for longevity
I use a mild detergent mixed with warm water to clean my cat hammock. This helps get rid of dirt and smells. A soft brush gently scrubs the fabric without harming it. I always take care not to soak the hammock too much.
Weatherproofing is key, too. It keeps moisture away, which protects from damage. I check for any tears or wear often. If I find small issues, simple DIY repairs can help a lot; patching them up extends the life of my hammock.
Regular upkeep makes my cat's space comfy and safe. Keeping things clean ensures my furry friend enjoys their cozy spot longer. Taking these steps gives me peace of mind knowing they have a nice place to rest….
Regular inspection and adjustments
I check my cat hammock often. This keeps it safe for my furry friend. I look for signs of wear and tear from scratching and kneading. If I see fraying or any weakness, I replace the hammock right away.
It’s important to securely fasten the hammock to support my cat's weight. Regular adjustments help ensure everything stays in good shape, too. Using tools like a staple gun makes it easier to tighten things up when needed.
Keeping an eye on these details ensures long-lasting comfort for my pet.
Conclusion

Creating a DIY cat wall hammock is a fun project. It gives your feline friend a cozy spot to relax. I hope you enjoy the process as much as your cat will love the result. A little effort goes a long way in making their space comfortable and safe.
Your cat deserves it!


Leave a Reply