
Does your indoor cat gaze at high spots around the house? My cat Max kept leaping onto my kitchen cabinets and bookshelves. I would hold my breath each time, worried he might knock things over or hurt himself.
Watching him turn my furniture into his personal climbing gym wasn't working.
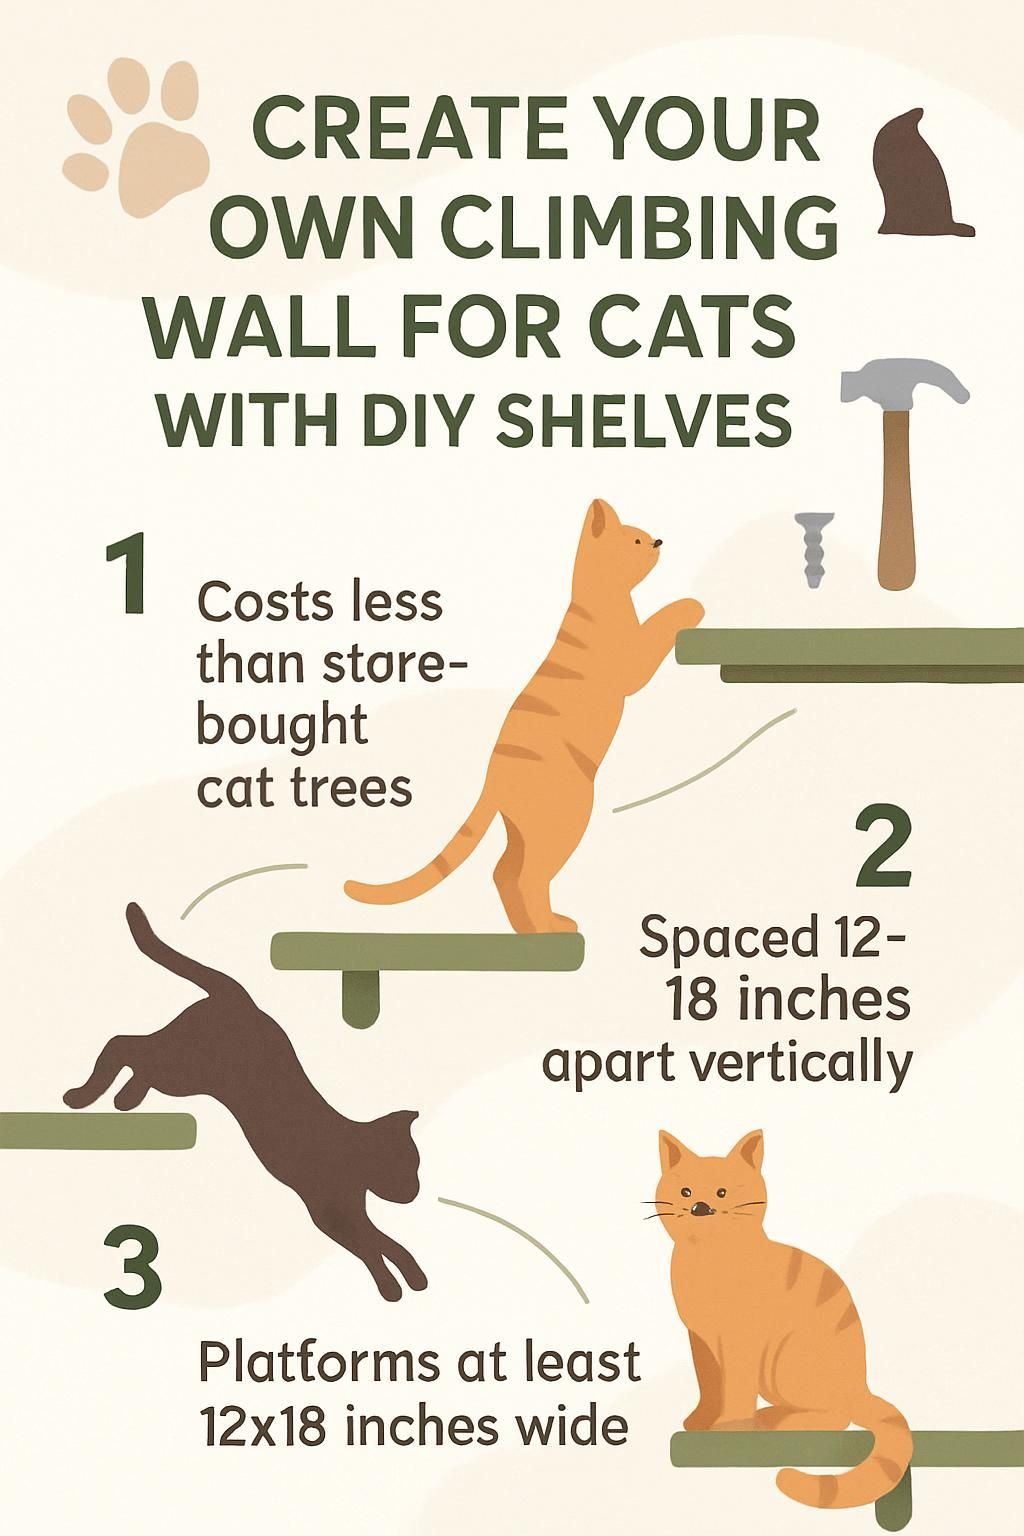
After many late nights of research, I found the perfect fix: a cat shelf climbing wall. This project costs less than fancy cat trees from the pet store and takes just one day to build.
The key is finding strong wall studs and using the right supplies. A basic stud finder helps locate perfect spots for mounting shelves that hold up to 40 pounds.
Building a cat climbing wall gives your pet a safe space to explore heights. You'll need simple tools like a drill and a staple gun, plus items such as wood boards and coconut fiber carpet.
Follow these steps to create a climbing heaven for your furry friend. Want to turn your blank wall into an exciting cat playground?
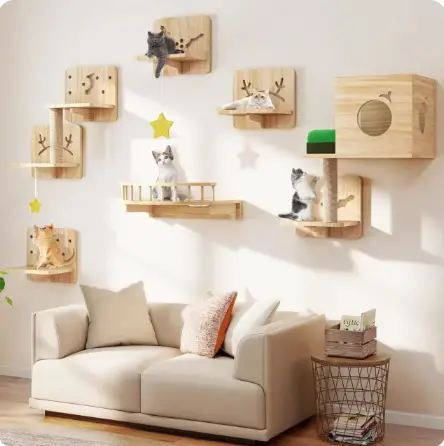
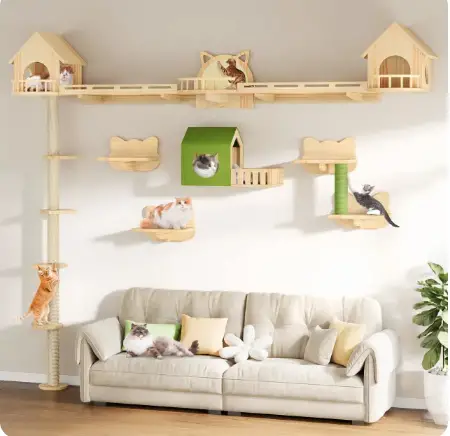
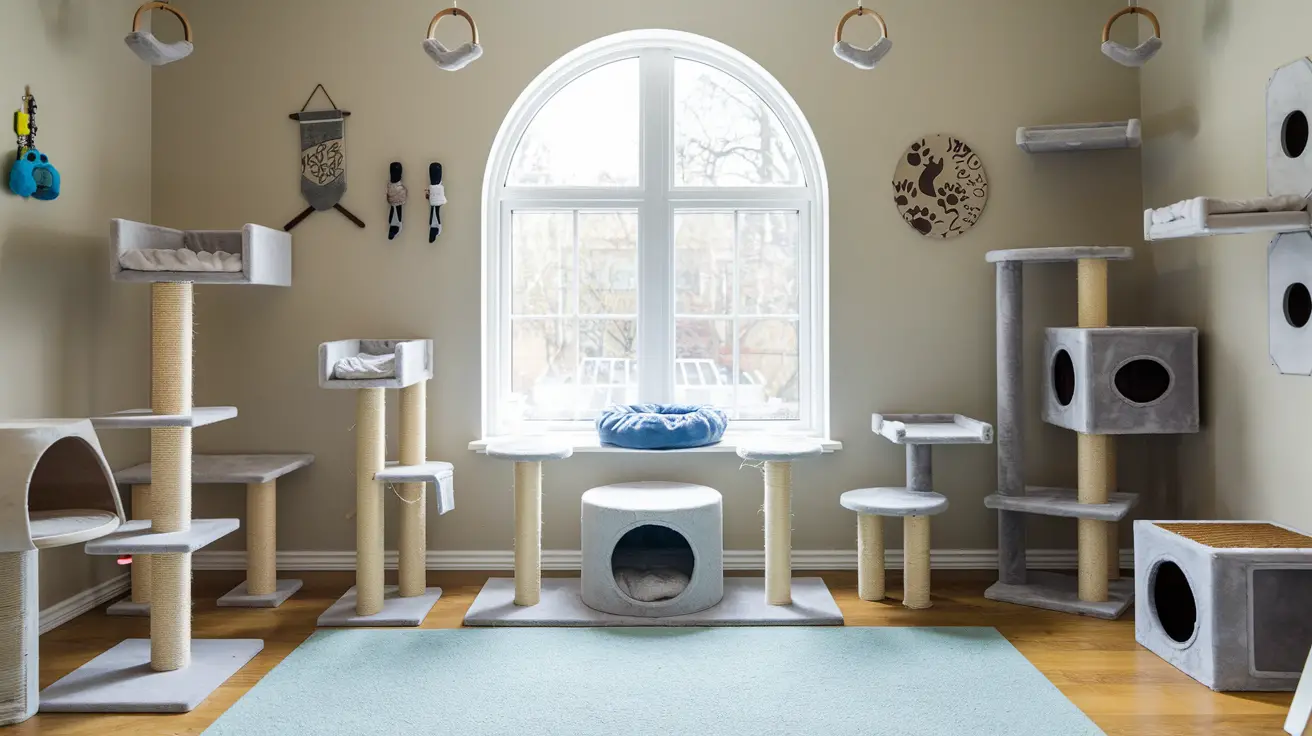
Solid Wood Wall-Mounted Cat Furniture
Key Takeaways
- Building DIY cat shelves costs less than store-bought cat trees and takes just one day to complete with basic tools like drills and staple guns.
- Shelves should be spaced 12-18 inches apart vertically, with the first shelf 16 inches from the floor, and platforms need to be at least 12 inches deep and 18 inches wide for cat comfort.
- Each shelf requires two corner brackets mounted into wall studs, which are typically 16-24 inches apart, and can support up to 40 pounds when properly installed.
- Coir carpet or woven loop-type carpet provides the best grip for cats, while shag or cut pile carpets should be avoided for safety reasons.
- The climbing wall should stay under 6 feet tall, include safe landing spots, and undergo weight testing with 20 pounds more than the cat's weight to ensure stability.
Materials and Tools Needed for a Cat Climbing Wall
I'll show you how to build a safe climbing wall for your cat using basic tools from your local hardware store. You'll need a stud finder, wood pieces, brackets, and soft carpets to create a cozy climbing space your cat will love.
What materials do I need to build shelves for my cat?

Building cat shelves needs careful planning and the right supplies. My cats love their climbing spots, so getting the materials right makes a big difference.
- Wood boards measuring 9 inches wide serve as the main shelf base, giving cats enough room to walk and rest
- Coir carpet from large carpet stores offers the best grip and stays durable longer than standard carpets
- Corner braces, at least 2 per shelf, keep the structure solid and prevent any wobbling
- Wood glue creates a strong bond between the carpet and the wooden base
- Staples sized 3/8 inch secure the carpet firmly to the wood surface
- Mounting screws that match your wall stud size hold everything safely in place
- A stud finder helps locate the strongest points in your wall for mounting
- Woven loop-type carpet works great as an alternative to coir, but skip shag or cut pile options
- Secondary wood pieces create nice overhangs where cats can peek down from above
- A simple measuring laser helps space the shelves properly for easy cat jumps
- A basic carpenter's level keeps shelves straight and balanced
- Pencil for marking stud locations and shelf positions on the wall
- Safety glasses protect your eyes during installation work
- Work gloves guard your hands while handling rough materials
What tools are essential for this DIY project?

I've built many cat climbing walls, and having the right tools makes all the difference. My latest project taught me that skipping even one essential tool can lead to wobbly shelves or unsafe installations.
- Drill with various drill bits: This power tool creates pilot holes in wall studs and helps mount brackets securely. The drill needs both Phillips head and standard bits for different screw types.
- Stud finder: This tool locates the solid wood beams behind drywall. Wall studs usually sit 16 to 24 inches apart and provide strong anchor points for cat shelves.
- Level: A laser level keeps shelves straight and prevents slanted surfaces that cats might slip on.
- Measuring laser: This helps space shelves properly and mark stud locations accurately on the wall.
- Pencil: Mark drilling spots and shelf placement clearly before making any holes.
- Large scissors: Cut carpet pieces to fit shelf tops and sides perfectly. Sharp blades make clean cuts without fraying edges.
- Staple gun: Attach carpet firmly to wooden shelves. The carpet needs strong staples that won't pop loose from cat activity.
- Safety gear: Protective goggles shield eyes from wood dust and debris while drilling.
- Screwdriver set: Tighten brackets and make final adjustments to mounted shelves.
- Vacuum cleaner: Clean up sawdust and carpet fibers during and after installation.
Designing Your Cat Wall Layout

I picked a sunny corner in my living room that gets lots of natural light – cats love basking in warm spots while they climb. My stud finder helped me map out the perfect spots for mounting shelves, creating a fun zigzag pattern that lets my cat jump from one level to the next.
How do I choose the best wall location for my cat shelves?

Picking the right spot for cat shelves starts with finding sturdy wall studs. My stud finder helps locate these support beams, which sit 16 to 24 inches apart in most walls. The perfect wall should be away from foot traffic but close to your cat's favorite hangout spots.
Near windows or existing perches work great since cats love watching birds and soaking up sunshine.
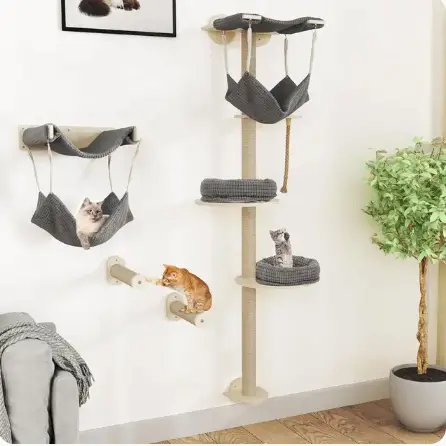
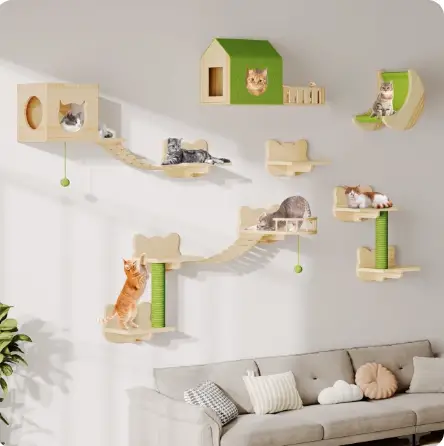
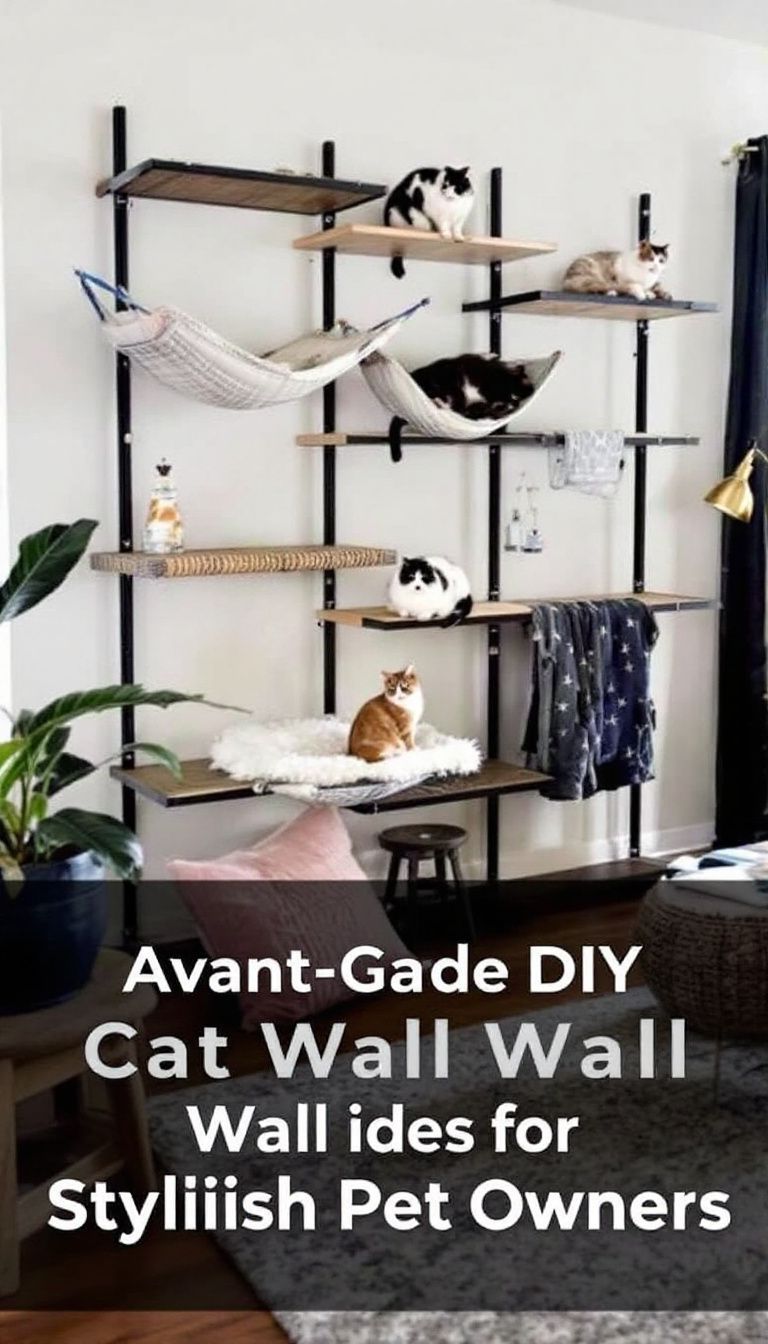
Cat Tree Wall Mounted with Hammock
The best setup needs clear space from floor to ceiling without blocking doors or walkways. Before drilling any holes, checking for pipes or wires behind the wall keeps everyone safe.
The bottom shelf works well at baseboard height, about 4 inches up. Each higher shelf needs enough space for jumping cats to land safely. Now let's talk about getting those shelves ready for installation.
How should I space and height the shelves for my cat’s climbing?

I space my cat shelves about 12 to 18 inches apart vertically. This gap lets cats jump easily between levels without strain. My stud finder helps me locate solid mounting points in the wall for proper support.
The first shelf sits about 16 inches from the floor, making it perfect for my cat to start climbing. Each level goes up in a zigzag pattern, creating an exciting path to the top of the wall.
A well-planned cat climbing wall turns any room into a feline playground while keeping your furniture scratch-free.
The total height of my climbing wall stays under 6 feet, keeping things safe and manageable. Cats need room to turn around on each shelf, so I make platforms at least 12 inches deep and 18 inches wide.
The spacing between shelves matches the natural jumping ability of most cats. The setup includes a lower shelf that serves as a safe landing spot for downward climbs. Now, let's talk about preparing those shelves with the right materials to keep your cat comfy and secure.
Preparing the Shelves

I'll show you how to transform plain wooden boards into cozy cat platforms with simple cuts and soft coverings. The stud finder helps me mark spots for brackets, while my measuring tape guides me to size each shelf just right for my furry friend's comfort.
How do I cut wood to the right sizes for cat shelves?

Cutting wood for cat shelves needs careful planning and exact measurements. My cats love to perch at different heights, so I start by marking the main board at my planned climbing height.
The stud finder helps me spot the perfect mounting spots on my wall. Next, I measure and mark a second piece of wood for the top overhang, making sure to leave enough room for my cats to stretch out comfortably.
Getting the cuts right makes a huge difference in how the shelves look and work. A circular saw works great for straight cuts, while a jigsaw handles any curved edges. The baseboards need special attention during measuring, as they affect where the shelves can sit against the wall.
Each piece of wood must match up perfectly with the mounting brackets to create a safe climbing space for my furry friends.
How can I cover shelves with carpet or fabric for my cat?

I love using coir carpet to cover my cat's climbing shelves. The rough texture gives my cats perfect grip while they play and climb. My process starts with cutting the carpet slightly bigger than each wooden shelf.
A staple gun with 3/8″ staples works great for fastening the carpet edges underneath the wood.
Wood glue adds extra hold between the carpet and the shelf surface. The glue needs to dry fully before stapling begins. Each staple is about two inches apart along the edges. Shag or cut pile carpets don't work well because cats can't grip them properly.
The stud finder helps locate solid mounting points for these carpeted shelves.
Installing the Shelves

I'll walk you through the most critical part of your cat's climbing wall – mounting those shelves rock-solid to your wall. You'll need a stud finder to locate the perfect spots where your brackets will grip tight, making your cat's new playground as steady as a mountain.
How do I securely attach brackets to the wall?

My favorite part of building cat shelves starts with finding the wall studs. A stud finder makes this task quick and precise. The studs give the brackets their strength, so marking their spots with a pencil helps me stay on track.
Each shelf needs two corner brackets placed exactly where the studs are located.
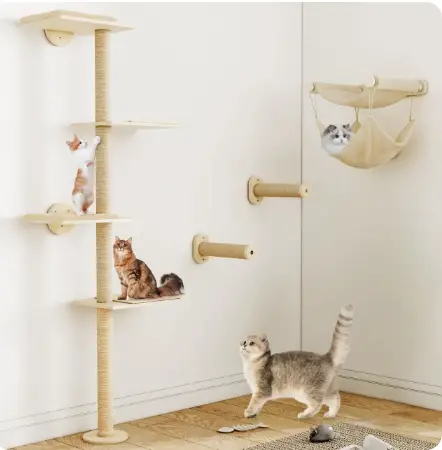
Cats Climbing Shelves for Large Cats
Mounting brackets takes careful planning and the right tools. The screws must go straight into the studs, not just the drywall, to hold up an active cat's weight. My experience shows that pre-drilling holes prevents the wood from splitting and makes the screws go in smoothly.
The brackets should sit level with each other, so a spirit level becomes my best friend during this step. Now that the brackets are secure, let's move on to fixing the shelves in place.
What is the best way to fix the shelves onto the brackets?

I grab my electric drill and start fixing the shelf to the brackets with strong screws. The key lies in placing screws at 12-inch spaces along the board, which spreads the weight nicely.
A stud finder helps me spot the perfect spots for mounting these brackets. The screws need to go in straight and tight to stop any wobbling that could make my cat nervous.
The shelf must sit perfectly level before the final screw tightening begins. Each screw gets an extra quarter turn to lock everything in place, making the shelf solid as a rock. My cats love testing new climbing spots, so I double-check each connection point with a gentle push.
Let's move on to adding some cool features that will make this climbing wall even more fun for your furry friend.
Adding Final Features and Safety Checks

I love to add fun extras like cozy hammocks and rope bridges to make my cat's climbing wall more exciting. I always test each new part by pushing and pulling on it with my full weight, just like my stud finder helps me spot the strongest spots in the wall.
How can I add hammocks or bridges to the climbing wall?

Adding hammocks and bridges brings extra fun to my cat's climbing wall. My furry friend loves to stretch out in a cozy hammock made from strong fabric like canvas or denim. The setup needs sturdy hooks or brackets on both ends to hold the hammock's weight.
For bridges, wooden planks wrapped in sisal rope or carpet give cats a safe path between shelves.
Tall Scratching Cat Tower Post and Perches
These features need solid mounting points to stay secure. The stud finder helps locate the best spots in the wall for attaching bridges and hammocks. Small wooden platforms work great as connection points between climbing sections.
Cats really enjoy having different paths to explore, so mixing bridges with regular shelves creates an exciting playground. The bridges should be wide enough for cats to walk across, but not so wide that they might fall off.
How do I test the climbing wall for stability and safety?

Now that I've added fun features to my cat's climbing wall, safety comes first. My next step focuses on testing each part to keep my furry friend safe and sound.
I start by pushing hard against each shelf to check for movement. A stud finder helps me double-check that all brackets hit solid wood behind the wall. Next, I put weight on each shelf, about 20 pounds more than my cat's weight.
This extra pressure tells me if the shelves will hold up during active play. The climbing spots should stay firm without any wobbles or sagging. I tap the brackets and screws to spot any loose parts.
Small fixes now stop big problems later. My cat stays off the wall until every shelf passes these safety checks. This careful testing gives me peace of mind about letting my cat explore the new climbing spots.
Conclusion

Building a cat climbing wall brings joy to both cats and their owners. My feline friend loves her new vertical playground, and the project cost less than store-bought cat trees. The DIY shelves give cats a safe space to climb, scratch, and observe their domain from above.
This simple weekend project creates a happy home for indoor cats who need exercise and mental stimulation. Your cat will thank you with endless hours of climbing fun on their custom-made wall adventure.
FAQs
1. What tools do I need to install cat shelves safely?
A stud finder is your most important tool. You'll also need a drill, level, screws, and mounting brackets.
2. How do I use a stud finder to mount cat shelves?
Run your stud finder slowly across the wall until it beeps or lights up. Mark these spots with a pencil, as these are the safest points for cat shelf installation.
3. How far apart should I space the shelves for my cat?
Place shelves about 12 to 18 inches apart vertically. This spacing lets cats jump comfortably between levels without strain.
4. What's the best height for starting cat shelf installation?
Start the first shelf about 2 feet off the ground. This gives your cat an easy starting point and helps build their confidence for climbing higher.
This website contains affiliate links. As an Amazon Associate and an affiliate for other programs, I earn from qualifying purchases. Clicking on an affiliate link may result in a commission being paid to me at no additional cost to you.
Leave a Reply